

Practical Guide to Proximal Femoral Nailing (PFN) Surgery
Phase I: Preoperative Planning & Positioning (The Setup)
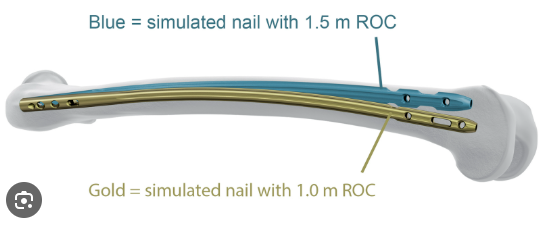
1. Beware of "Radius of Curvature (ROC) Mismatch"
• Check imaging: MUST obtain a full lateral view of the femur.
• Red flag: Patients of Asian descent or shorter stature (<160 cm) often have a significant femoral anterior bow (smaller ROC, ~1.0-1.2 m).
• Strategy: Using a standard long nail designed for Western populations (larger ROC, 1.5-2.0 m, straighter) carries a high risk of anterior distal cortical impingement.
• First choice: Switch to a nail with a smaller ROC (more curved).
• Second choice: Use a short nail (bypassing the distal curve), but it must pass the isthmus.
• Backup: If a long nail is mandatory, be prepared to use the Poller screw (blocking screw) technique.
2. Patient Positioning
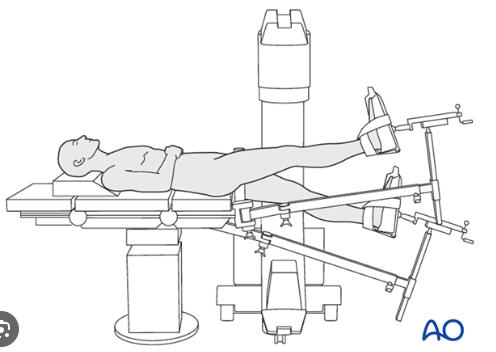
• Adduction of the affected limb: The limb MUST be adducted 10-15 degrees.
• Rationale: Exposes the greater trochanter. Failure to adduct forces the entry point laterally, leading to iatrogenic lateral wall blowout and varus malalignment.
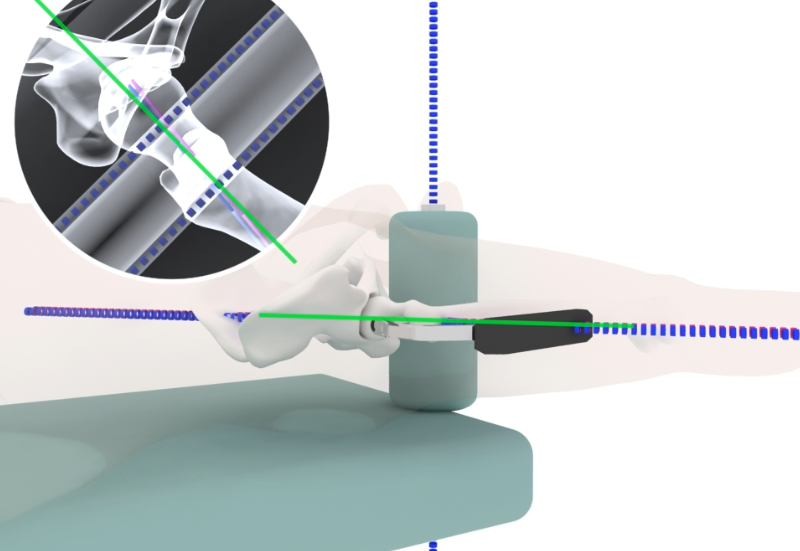
• Scissor position: The contralateral leg is lowered and extended posteriorly, while the affected leg is slightly flexed. This ensures true lateral fluoroscopic imaging of the femoral neck.
Phase II: Fracture Reduction (The Foundation) – The Most Critical Step
1. Cardinal Rule
• FORBIDDEN: NEVER attempt to use nail insertion to reduce the fracture! "Nail will NOT reduce the fracture."
• Standard: Reduction MUST be completed BEFORE reaming.
• AP view: Restore medial cortical support (posteromedial support). Mild valgus is acceptable; varus is NEVER acceptable.
• Lateral view: Cortical alignment must be continuous, with no "posterior sag."
2. The "Three Essential Techniques" for Inadequate Reduction
• Joystick technique: Insert a Schanz pin into the greater trochanter or anterior femoral neck. Use it as a lever to control the proximal fragment, correcting flexion and rotation.
• Ball-spike pusher: Percutaneously apply pressure on the greater trochanter/proximal fragment to correct varus, or on the distal fragment to correct posterior sag.
• Clamp and plate technique (for 31-A3 reverse intertrochanteric fractures): Through a small lateral incision, use a plate and a reduction clamp to "pull" the displaced femoral shaft laterally, restoring lateral wall integrity.
Phase III: Entry Point (The Watershed Moment)
1. The Goldilocks Zone: Slightly Medial to the Trochanteric Tip
• Specific location: On AP view, the entry point is at or slightly medial (approx. 5 mm) to the tip of the greater trochanter. On lateral view, it MUST be collinear with the axis of the femoral canal.
• Fatal Trap (lateral entry): A lateral entry point causes the reamer to skive and shave the lateral wall.
• Consequence: Lateral wall blowout = iatrogenic instability = extremely high cut-out rate.
2. Pro-Tip to Protect the Lateral Wall
• Entry reaming: Proximal reaming must be adequate (0.5-1 mm larger than the nail's proximal diameter) to prevent the "wedge effect" during nail insertion from splitting the wall.
• "Virtual Lateral Wall" technique: If the lateral wall is already comminuted or weak, insert two Kirschner wires laterally to act as a "fence," forcing the reamer/drill to take a more medial path.
Phase IV: Reaming & Nail Insertion
1. Beware the "Hard Stop"
• Sign: During nail insertion, a sudden, firm resistance is felt halfway down the canal, with a change in hammering sound to a sharp "ping."
• Cause: The nail tip is impacting the anterior cortex of the distal femur (ROC mismatch).
• Action: STOP hammering immediately!** Continued force risks a femoral shaft split.
• Salvage:
• Withdraw the nail and ream the distal canal.
• Use the Poller screw technique: Insert a blocking screw into the anterior cortex of the distal fragment (anterior to the intended path) to "bounce" the reamer/nail posteriorly.
• Alternatively, use a "curved guidewire technique" to steer the nail posteriorly.
Phase V: Proximal Locking
1. Screw Position: Low and Deep
• AP view: Inferior-center. Place the screw close to the calcar, the densest bone.
• Lateral view: Centered.
• Quantitative target: CalTAD < 25 mm. This is more critical than the traditional TAD. Aim for inferior position on AP, not central.
2. Preventing the "Z-Effect" (for dual-screw systems like Intertan/PFN)
• Long-short pairing: The superior anti-rotation screw MUST be 15-20 mm shorter than the inferior lag/compression screw.
• Principle: Ensures the inferior, larger-diameter screw bears the main load. If the superior screw is too long and load-bearing, the Z-effect (one backing out, the other cutting through) is inevitable.
3. Preventing Cut-through (for helical blade systems like PFNA)
• Cement augmentation: For severe osteoporosis, the helical blade's purchase may be insufficient, risking it cutting through the osteoporotic bone like butter. Consider using a blade with cement-injection capability for augmentation.
Phase VI: Distal Locking
1. Solving Jig Mismatch (Aiming Arm Inaccuracy)
• Sign: The drill bit contacts metal but cannot pass through the locking hole. This occurs due to slight bending of long nails within the canal.
• "Screw First" salvage technique: First, thread a screw into the aiming sleeve. The tapered screw head will self-center in the locking hole. Use this as a guide for the guidewire, followed by cannulated drilling.
2. Locking Mode
• Unstable fractures: MUST use static locking (round hole) for unstable fracture patterns to prevent shortening.
Summary: An Intraoperative Checklist
- Positioning: Is the affected limb adducted? (If not, the entry point will be too lateral).
2. Reduction: On AP, is medial support restored? On lateral, is there posterior sag? (Do NOT ream without reduction).
3. Entry Point: Is it medial to the tip? (A lateral start spells disaster).
4. Tactile Feedback: Was there a "hard stop" during nail insertion? (If yes, STOP immediately to prevent blowout).
5. Screw Position: Is the screw close to the calcar? (CalTAD < 25 mm).
6. Dual Screws: Is the superior screw sufficiently short? (Prevents Z-effect).