Characteristics of Intramedullary Nails
Minimally Invasive: Intramedullary nails are inserted through small incisions, reducing damage to surrounding soft tissues and facilitating post-operative recovery.
Stability: By acting directly within the medullary canal, the nail provides stability along the long axis of the diaphysis, aiding in fracture alignment and healing.
Load Sharing: Positioned within the medullary canal, the nail can bear partial or full body weight during the fracture healing process, reducing stress on other structures.
Adjustability: Many modern intramedullary nailing systems feature adjustable locking screws, allowing the surgeon to modify fracture alignment intraoperatively or postoperatively.
Adaptability: Intramedullary nails are available in various sizes and designs to accommodate different fracture types and anatomical locations.
Biomechanical Advantage: The design of intramedullary nails considers bone biomechanics, such as stress distribution and load transfer, thereby enhancing therapeutic efficacy.
Removability: While many intramedullary nails can remain in situ permanently, they can also be removed after fracture healing if necessary.
Types of Intramedullary Nails
1. By Strength: Rigid intramedullary nails, Flexible intramedullary nails (e.g., Ender nails, TEN).
2. By Reaming Technique: Reamed intramedullary nailing, Unreamed intramedullary nailing.
3. By Insertion Direction: Antegrade intramedullary nailing, Retrograde intramedullary nailing.
4. By Fixation Method: Locked intramedullary nails, Unlocked intramedullary nails.
5. By Material: Stainless steel intramedullary nails, Titanium intramedullary nails, Bioabsorbable intramedullary nails.
6. By Cross-sectional Shape: Cannulated (hollow) intramedullary nails, Solid intramedullary nails.
Applications of Intramedullary Nailing
① Interlocking Intramedullary Nailing for Humeral Fractures
Indications: Fractures located from 2 cm distal to the surgical neck to 5 cm proximal to the olecranon fossa.
Surgical Techniques:
Patient Positioning: Beach chair position (most commonly used) or supine position.
Incision & Entry Point: A longitudinal or transverse incision is made 3-5 cm lateral to the acromion. The deltoid muscle is split bluntly in line with its fibers to expose the subacromial bursa, which is excised if necessary. The rotator cuff is protected to expose the greater tuberosity. The entry point should be medial to the apex of the greater tuberosity, approximately 5-10 mm posterior to the bicipital groove. If the fracture is unstable, two screws can be considered for distal locking. During distal locking, care should be taken to ensure the orientation of the greater tuberosity aligns laterally with the lateral epicondyle of the humerus to minimize rotational malalignment of the humeral shaft.
② Interlocking Intramedullary Nailing for Tibial Shaft Fractures
Indications: Stable fractures of the middle third of the tibia (transverse, short oblique fractures, pseudarthrosis). Unstable fractures within the central 60% of the tibial length (metaphyseal junction fractures, long spiral fractures, segmental fractures, comminuted fractures, fractures with bone loss). Primarily indicated for middle tibial fractures. Although applicable to proximal and distal tibial fractures, the complication rate is higher, with an increased risk of malunion.
Surgical Techniques:
Patient Positioning: Supine position.
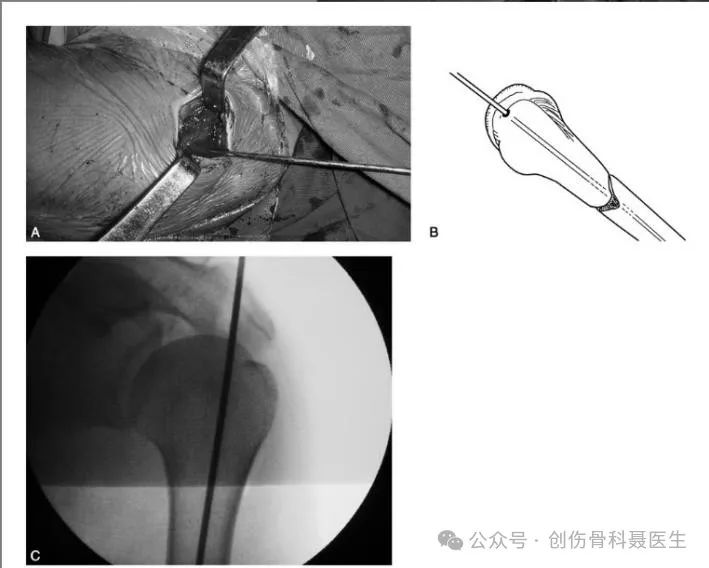
Incision & Entry Point:
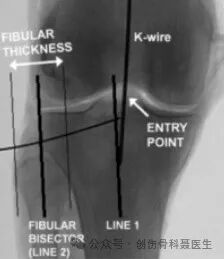
AP View: The entry point is located at the intersection of the mechanical axis of the tibia with the tibial plateau. This corresponds to a point just medial to the lateral intercondylar eminence. Draw a line parallel to the mechanical axis on a standard AP radiograph, positioned on the lateral aspect of the tibial plateau; this line should bisect the fibular head.
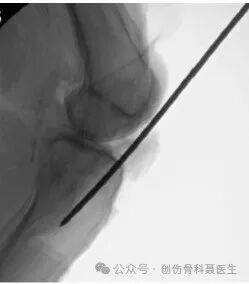
Lateral View: On a standard lateral radiograph (where the femoral condyles and tibial plateaus are superimposed), the entry point is situated at the "watershed line" – the junction (transition zone) between the anterior margin of the tibial plateau and the beginning of the tibial shaft.
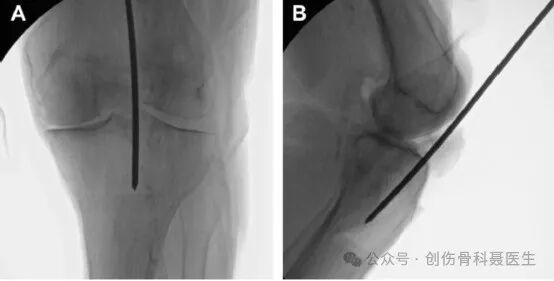

Standard AP Radiograph:
On a correct AP view, a line is drawn along the mechanical axis of the tibia. A second line is drawn parallel to this mechanical axis, originating from the lateral edge of the tibial plateau. This parallel line should precisely bisect the fibular head.
Standard Lateral Radiograph:
On a correct lateral view, the medial and lateral femoral condyles should be essentially superimposed, and the medial and lateral tibial plateaus should also be superimposed. In this true lateral projection, the entry point is confirmed to be at the watershed line (the junction of the plateau and the shaft).
③ Antegrade Interlocking Intramedullary Nailing for Femoral Shaft Fractures
Indications: Various fracture types located from 2 cm below the lesser trochanter to approximately 9 cm proximal to the knee joint (distal to the femoral isthmus).
Patient Positioning: Supine or lateral position on a fracture table.
Incision & Entry Point:
Greater Trochanteric Entry Point: The entry point is at the tip of the greater trochanter. On the AP view, it aims toward the medial aspect of the medullary canal; on the lateral view, it aligns with the center of the trochanter and the femoral canal. The trochanteric entry point is often used in obese patients, is technically less demanding, and may be associated with shorter operative times and lower complication rates compared to the piriformis fossa entry.

Piriformis Fossa Entry Point: The entry point is located at the piriformis fossa (the depression medial to the greater trochanter, at the base of the femoral neck), which is the attachment site for the obturator externus tendon. This is the true anatomic starting point aligned with the femoral canal.

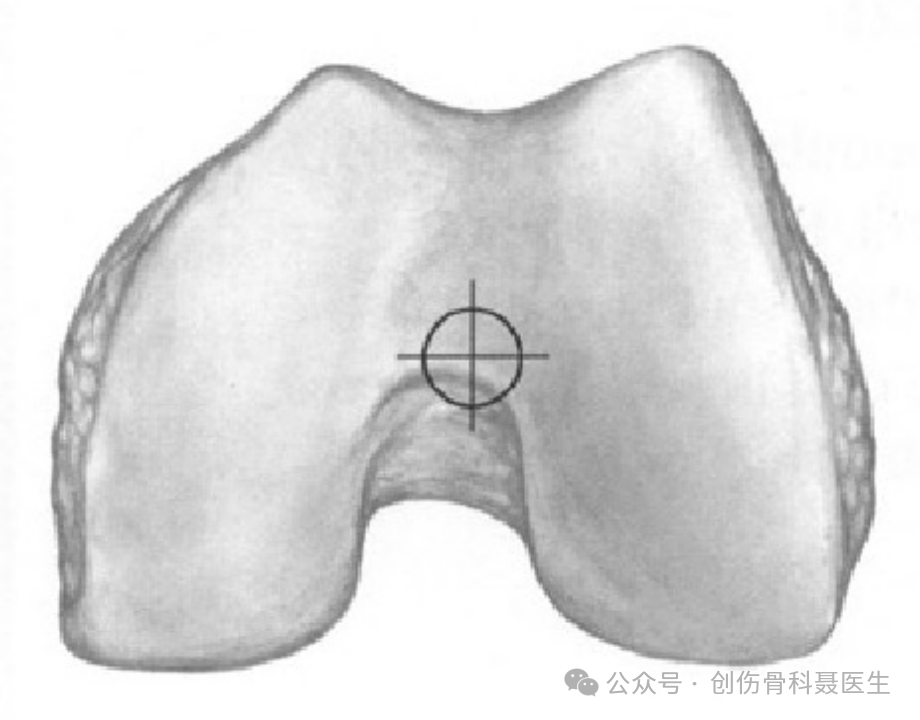
④ Retrograde Interlocking Intramedullary Nailing for Femur Fractures
Indications: Primarily indicated for supracondylar femoral fractures, including comminuted supracondylar fractures and intercondylar "T" and "Y" type comminuted fractures involving the articular surface. Also suitable for femoral fractures distal to the isthmus, including fractures of the distal femoral shaft, supracondylar region, and intercondylar region, typically within 20 cm of the knee joint.
Patient Positioning: Supine position.
Incision & Entry Point: With the knee flexed to approximately 30°, the ideal entry point is located at the center of the intercondylar notch, approximately 1.2 cm anterior to the femoral attachment of the posterior cruciate ligament (consistent with the axis of the medullary canal).
Disclaimer: This article is reproduced from the source . The copyright belongs to the original author. It is intended for educational exchange purposes only. If there is any infringement, please contact us for removal.


CARE FOR LIFE, REBUILD BONES
16+ years of accumulated clinical experience,specializing in the development of complex trauma repair and orthopedic technology systems
No. 31, Lane 1515, Rongle East Road, Songjiang District, Shanghai
Copyright © 2026 Shanghai CareFix Medical Instrument Co., Ltd All rights reserved. Privacy Policy


