

【Lekcioni Kirurgjik】Udhëzuesi Standard i Nailimit Intramedular të Tibis (IMN): Nga Zgjedhja e Qasjes deri te Parandalimi i Rreziqeve
Frakturat e trupit të tibis janë lëndime shumë të zakonshme në traumatologjinë ortopedike, zakonisht të shkaktuara nga trauma me energji të lartë (si aksidentet me mjetet motorike) ose nga lëndimet torsionale me energji të ulët.
Nailimi intramedular është aktualisht "standardi i artë" për trajtimin e këtyre frakturave. Megjithatë, zgjedhja e saktë e pikës hyrëse, shmangia e dëmtimit neurovaskular dhe parandalimi i sindromës së kompartementit mbeten kritikë për suksesin kirurgjik.
Ky artikull ofron një vlerësim të hollësishëm të procedurës standarde, anatomisë kryesore dhe gabimeve të zakonshme kirurgjikale gjatë fiksimit intramedular të tibias.
I. Vlerësimi Paraoperativ dhe Pikat Kryesore Anatomike
1. Anatomia Bazë
Para se të vazhdohet, kirurgu duhet të ketë njohuri të thella rreth strukturave të mëposhtme për të shmangur dëmtimet iatrogjene:
* Patela & tendoni patelar: Përcakton vendndodhjen e prerjes.
* Kreshta e tibias: Një shenjë sipërfaqësore e rëndësishme.
* Ligamenti transversal i gjurit: Duhet shmangur gjatë përgatitjes së pikës së hyrjes.
* Nervi safen dhe vena e madhe safene: Ndodhen në zonën e shkruatave të fiksimit proksimal; teknika e pasaktë mund t'i dëmtojë lehtësisht.
2. Përgatimi paraoperativ dhe pozicionimi
* Anestezia: Duke pasur parasysh rrezikun e sindromës akute të kompartimentit (ACS), anestezia e përgjithshme është e preferuar për të lejuar monitorimin neurologjik vazhdimës pas operacionit.
* Pozicionimi: Pozicioni supin. Krahët e dëmtuar mund të pozicionohen sipas preferencës së kirurgut: mbi një trekëndësh transparënt për rreze X, në një këpucë të trakcionit ose duke përdorur teknikën e këmbës së penduar.
* Referenca: Për frakturat e shpërndara, konsideroni përgatitjen dhe mbulimin e krahët të kundërt, të pa-dëmtuar, për të lejuar krahasimin intraoperativ të rrotacionit dhe aligmentit.
* Modelimi paraoperativ: Matni diametrin e kanalit intramedullar në rrezet X për të siguruar madhësitë e duhura të thonjve, veçanërisht tek pacientët me staturë më të vogël.
* Larg: Nëse dyshohet se ka ACS para operacionit, duhet të kryhet dekompresioni (fasciotomia me dy prerje në këmbë) para se fiksimi i thyerjes.
II. Hapat kirurgjikë (Hapat hap pas hapi)
1. Reduktimi i frakturave
* C-arm konfirmimi: Sigurohuni që mund të merren imazhe të përshtatshme anteroposterior (AP) dhe laterale.
* Metoda e reduktimit: Përparohet reduktimi i mbyllur. Për të mbajtur përsëritjen, mund të përdoren kapakë perkutane të reduktimit. Nëse reduktimi i mbyllur dështon, mund të jetë e nevojshme një reduktim i vogël i hapur ose përdorimi i një metode të thyerjes perkutane me çekiç ose me visë të sheshtë.
* Vlerësimi: Pas reduktimit, vlerësoni me kujdes rrotullimin, gjatësinë dhe rreshtimin.
2. Incizioni i lëkurës dhe ekspozimi
* Lokalizimi i incizionit: Një tel udhëzues mund të vendoset në lëkurë përgjatë boshtit të kanalit tibial dhe të kontrollohet me fluoroskopi për të përcaktuar pozicionin optimal të prerjes mediolaterale.
* Shtegu i incizionit: Palpizoni polin inferior të patelës. Bëni një prerje longitudinale p along boshtin e tendinit patelar, duke e zgjatur poshtë deri në nivelin e pllakës tibiale.
* Ekspozimi i thellë: Identifikoni kufijtë medial dhe lateral të tendinit patelar. Ndajeni longitudinalisht tendinin në mes për të ekspozuar padën adipose të Hoffa-s nën të.
3. Përcaktimi i pikës së hyrjes (Hapi i rëndësishëm)
* Ekspozimi i kockës: Përdorni retraktorët e vetëmbajtës për të ekspozuar platformat tibiale të proksimale dhe për të palpuar skajin anterior të platformat.
* Pjesa e Padsë të Yndyrës së Handle: Një pjesë e padsë së yndyrës së Hoffa mund të heqet për të përmirësuar vizualizimin, por duhet shmangur heqja e tepërt që të mos hyhet në kapsulën e artikulacionit të gjurit dhe të dëmtohet ligamenti transversal.
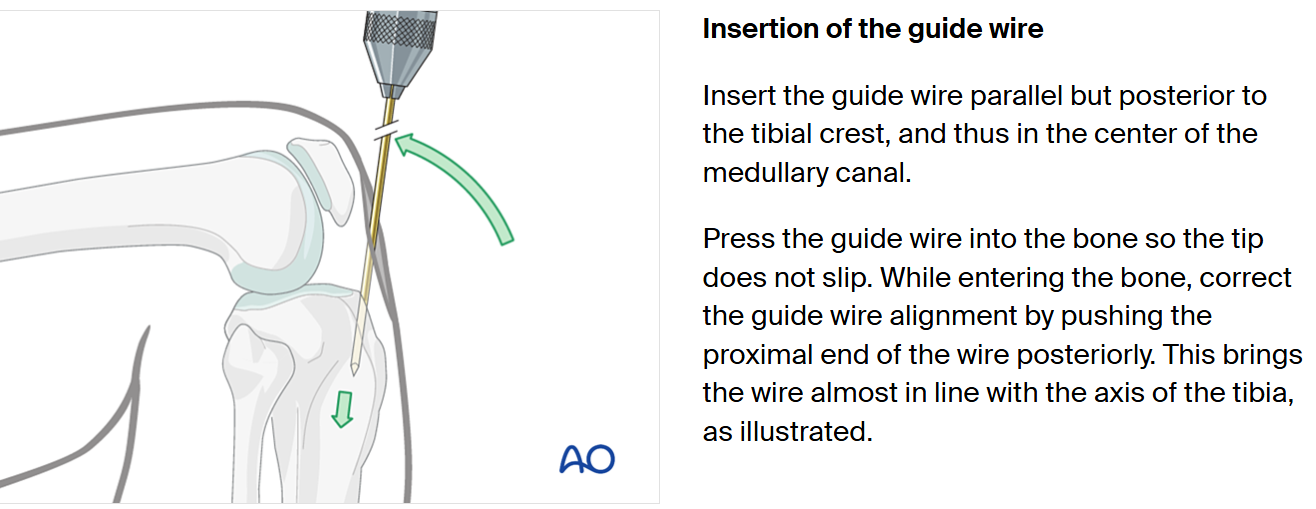
* Vendosni Guidewire-in:
* Shikimi Lateral: Maja duhet të jetë pak distalisht dhe anteriorisht nga sipërfaqja artikulare, në skajin anterior të platformat.
* Shikimi AP: Guidewire-i duhet të jetë plotësisht i qendruar brenda kanalit medular.
* Larg: Shtyrni guidewire-in paralelisht me boshtin e gjatë të shkëmbit tibial për rreth 10 cm.
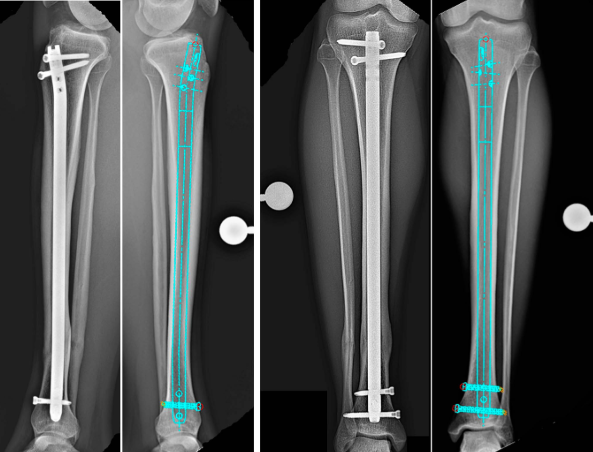
(Figura: Diagramë e një thyerje të shkëmbit tibial)
4. Hapja dhe Reaming-u
* Kanali i Hapur: Përdorni një gurëzë me kanal ose një rrasësë hyrëse për të hapur korteksin proksimal (rreth 5 cm thellë).
* Futja e Ujëzës Udhëzuese: Kaloni një ujëzë udhëzuese me majë sferike përmes vendit të thyerjes. Këshillë: Kurdimi i majës së ujëzës mund të ndihmojë në lëvizjen e saj përmes vijës së thyerjes.
* Pozicionimi i Ujëzës Udhëzuese: Maja distale e ujëzës udhëzuese duhet të jetë qendruar në lidhjen e këmbës, rreth 1 cm proksimalisht nga plafondi tibial. Konfirmojeni pozicionin me fluoroskopi AP dhe lateral.
* Teknika e Rrasjes:
* Filloni me rrasësen me diametrin më të vogël.
* Rritni diametrin me inkrementa prej 0,5 mm.
* Kur dëgjoni dhe ndjeni se reamer-i përfshin kortiksin endostel në istmus ("kortikal chatter"), keni arritur diametrin maksimal. Reamoni duhet të jetë 1–1,5 mm më i madh se diametri i planifikuar i shiritit.
5. Futja dhe bllokimi i shiritit
* Futja e shiritit kryesor: Shtyrni shiritin e zgjedhur mbi telin udhëzues, duke e tapuar lehtësisht përtej vendit të thyerjes. Shiriti duhet të ndalet në metafizën distale.
* Bllokimi proksimal:
* Bashkoni aparatin e synimit. Drillojni nga medialisht në lateral (ose sipas dizajnit të implantit).
* **E rëndësishme:** Gjithmonë kryeni një disekcion të butë deri në kockë për të mbrojtur venën safenë dhe degët e saj, si dhe nervin safen.
* Zakonisht vendosen dy skruca (një dinamike, një statike).
* Bllokimi distal:
* Përdorni teknikën me dorë të lirë të "rrethit perfekt".
* Rregulloni C-arm deri sa vrimat e mbylljes të duket plotësisht rrumbullake.
* Mbroni strukturat neurovaskulare. Bëni një prerje dhe përdorni disekcionin blunt deri në kockë para ngurëzimit.
6. Mbyllja e plagës
* Arrini hemostazë të hollësishme.
* Mbyllni lidhësin patelar me suture absorbuese të ndara (p.sh., Vicryl #1).
* Mbyllni paratenonin, indin nënqepinor dhe lëkurën në shtresa.
III. Gabimet e zakonshme kirurgjikore
1. Reduktim i papërshtatshëm
Reduktimi i dobët është shkaku kryesor i bashkimit të vonuar ose të gabuar. Ai bën edhe kalimin e telit udhëzues ekstremisht të vështirë.
* Zgjidhja: * Përdorni kontrolla të shpeshta fluoroskopike. Përdorni klisha perkutane ose teknika mini-hapur kur është e nevojshme.
2. Incizion i pasaktë dhe pikë hyrjeje
Kjo është një shkak i përbashkët i zhvendosjes ose i maliqimit iatrogjenik të frakturës.
* Incizion ekscentrik: Një incizion shumë medial ose lateral bën që futja e telit udhëzues dhe gërshërimi të jenë ekscentrikë.
* Pikë hyrjeje e pozicionuar gabimisht: Veçanërisht në frakturat distale, një pikë hyrjeje e pasaktë mund të çojë në deformitet të rëndë varus/valgus ose procurvatum/recurvatum.
* Standardi: Teli udhëzues duhet të qëndrojë në qendër, 1 cm proksimalisht nga kyçi i këmbës (e konfirmuar në pamjet AP dhe laterale).
3. Dështimi në identifikimin e sindromës akute të kompartimentit (ACS)
* Rrezik: ACS e paparë dhe e patraktuar çon në nekrozë muskulare të përhershme dhe humbje funksionale.
* Zgjidhja: Ruani një nivel të lartë të dyshimit pasoperativ. Nëse diagnostikohet ose dyshohet fort, kryeni menjëherë fasciotomi.
4. Mënyra e paqëndrueshme e manipulimit të indit dhe dëmtimi termik
* Nekroza termike: Përdorimi i shumë agresiv ose i një reamer-i me majë të bllokuar mund të shkaktojë osteonekrozë termike të kockës.
* Dëmtimi neurovaskular:
* Bllokimi proksimal: Grenat e venës safene janë në rrezik.
* Bllokimi distal: Bundli neurovaskular është në rrezik, veçanërisht kur përdoren skruet e fiksimit AP ose oblike.
* Zgjidhja: Zbatoni parimin e **"disekcionit të butë deri në kockë"** për të gjitha prerjet për skruet e fiksimit.
IV. Kujdesi pas operacionit
* Parimet e mbajtjes së peshës:
* Frakturat transversale: Mund të lejojë mbajtjen e plotë të peshës menjëherë pas operacionit.
* Frakturat e shpërndara ose segmentale: Rekomandohet mbajtja fillestare e peshës vetëm me majën e këmbës.
* Monitorimi: Monitoroni ngushtë rritjen e dhimbjes dhe të shpëndrrimit pas operacionit, duke mbajtur vëmendje të vazhdueshme për ACS.